Introducing (drum roll, please) the Candlestick, a completely passive, set-it-and-forget-it hydroponic wick system. Designed for simplicity and efficiency, this system ensures your plants get just the right amount of water and nutrients without the need for constant monitoring or electrical components. It’s perfect for beginners or anyone looking for a low-maintenance way to grow plants at home!

If you’d like to learn more about basic wick systems, you can check out our Wick System Guide, explore the Hydroponics Hobby Center, or take our online course Off-Grid Hydroponics, where I demonstrate the Candlestick Method along with other techniques. But anywho, back to our topic!
What is the Candlestick?
How it works: The Candlestick is a simple hydroponic design, with its most innovative feature being an inverted reservoir. As shown in the diagram below, a bucket (in my setup, I used a 5-gallon bucket) is filled with water and nutrients. Then, a hole is poked near the top of the bucket (about an inch or two from the rim). After putting the lid back on, the bucket is flipped upside down and placed inside the grow tray.
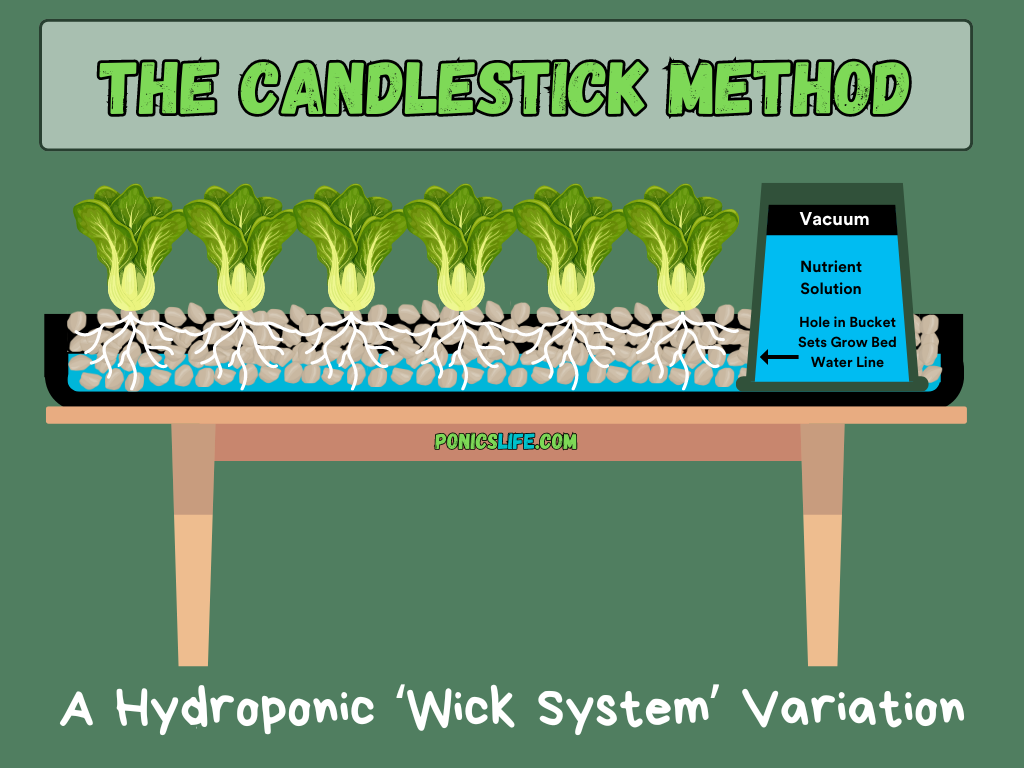
And (another drum roll, please) this is where things get interesting. As the grow tray fills up with water, it will eventually stop when the water level reaches the top of the hole in the bucket. Why does it stop? Well, it’s all thanks to air pressure and vacuum dynamics! As long as the water level in the tray stays above the hole, air can’t enter the bucket, creating a vacuum that prevents more water from flowing out. When the water level drops below the hole, air enters the bucket, breaking the vacuum and allowing the nutrient solution to flow. So, essentially, it’s an automatic watering system that releases water as your plants soak it up. Every time the water level drops below the hole, the nutrient solution starts flowing again—just like an automatic dog-watering bowl.
Why I call it the Candlestick: I started saying “Candlestick” because it straight up looked like a candlestick. And for a minute there I actually thought that I had invented the whole concept, but as expected, there have been plenty of people who have beat me to it. Mitchell Tompkins (From Hoochos) had actually made something similar using an automatic dog watering bowl and then I ran into it again in Dr. Howard’s book ‘Hydroponics for the Home Grower’ where he used it for a nursery tray (and then who knows how many hobbyists have done something similar). But, I’ll say that what I have pictured below is in fact a little different in that I’m using a 5-gallon bucket and making it work on a slightly larger scale. And the result? Well, a lean, mean, growing machine!
My First Trial Run
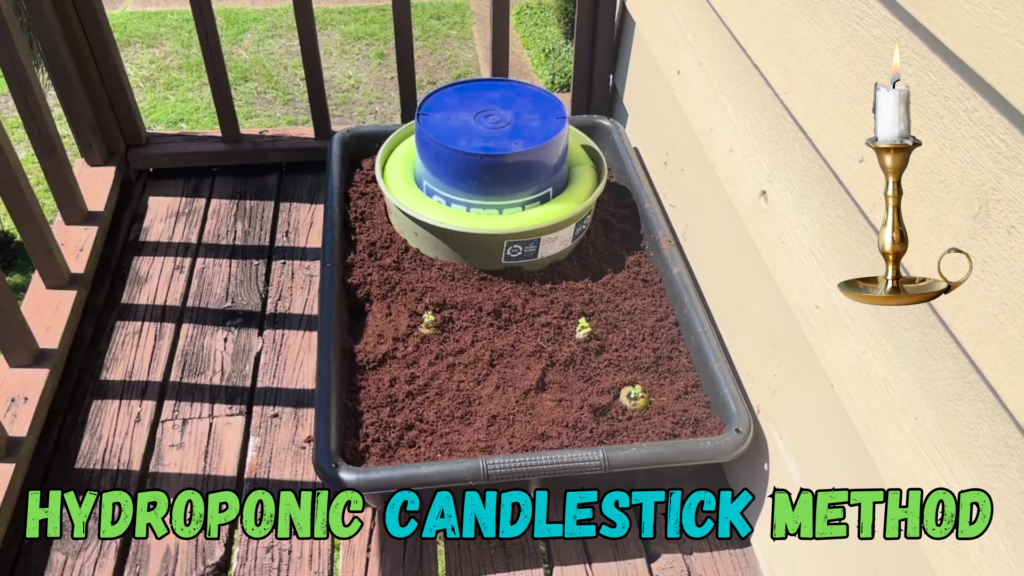
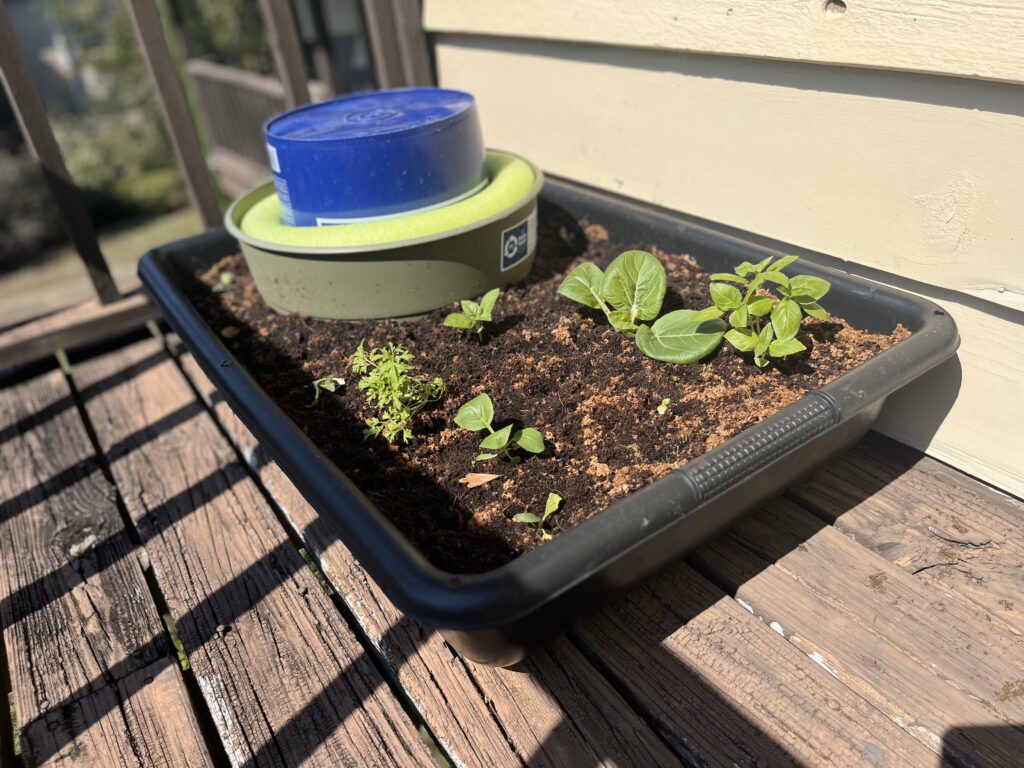
What I did: As you can see in the picture, I soaked some coco chips in water and nutrients, then placed them into an oval stock tank (around 15 gallons I believe). Then after cutting the hole in the top of the bucket and filling it with the nutrient solution, I secured the lid, flipped the bucket upside down, and placed it into my grow tray/stock tank.
What worked: As a whole, it worked, or at least I could tell that it had potential. The plants I transferred into it grew, and some of the seeds I sprinkled into the system did okay too. It worked as designed, and the concept was solid.
What didn’t work: As a trial run, there was a lot that went wrong. For one, I used coco chips instead of coco pith thinking that the large gaps (aka air spaces) would provide extra oxygenation. Hard to say if this was a good idea or not but I can confirm that my plants did in fact do better with coco pith on try 2.0. Secondly, I grew out of season, which wasn’t exactly ideal (and I ended up having some pretty stunted lettuce). And third, I had it out in the open which, as you probably guessed, was a pretty bad idea overall as it allowed rain in, which ultimately diluted the nutrient solution. And lastly, I found it hard to get the bucket/reservoir in and out of the grow tray to refill it, as I had to shift the grow media aside each time.

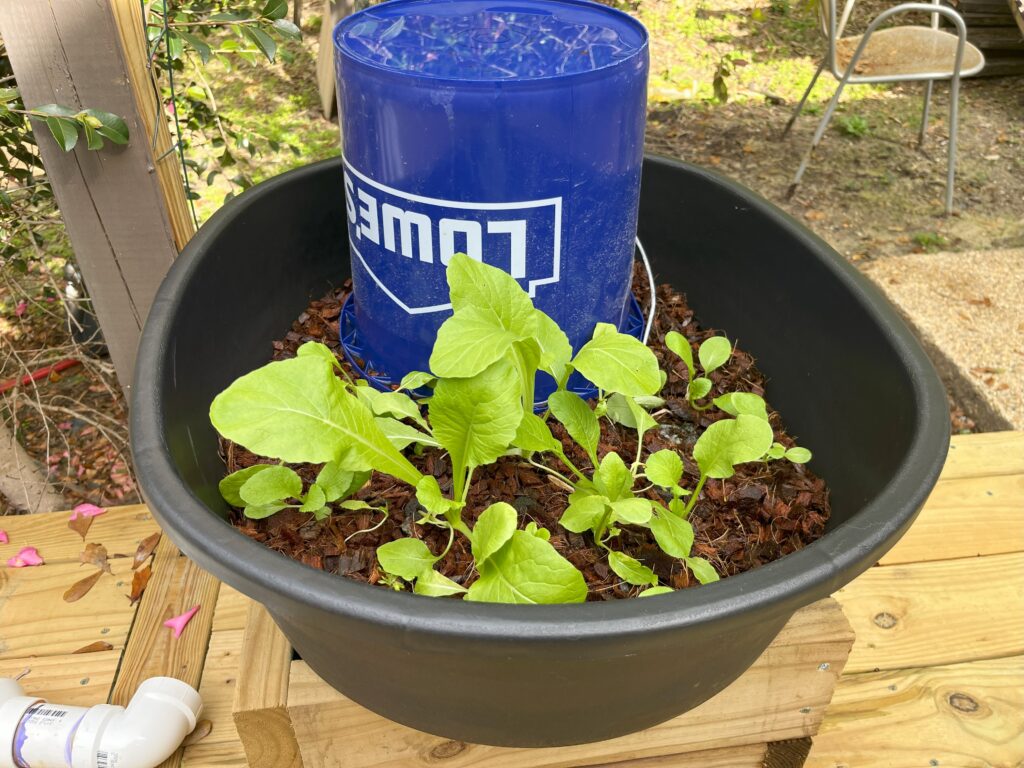
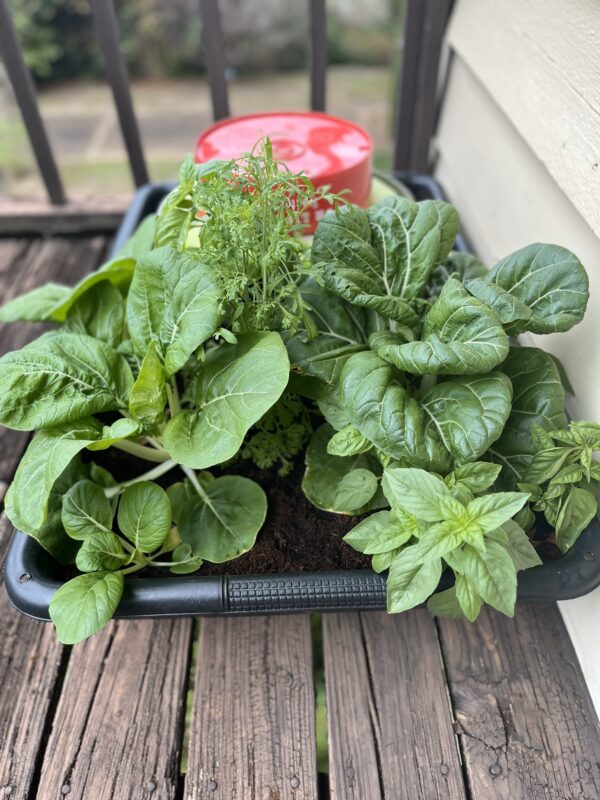
The Final Product
Description: I’m pretty proud of the final version. The concept remains mostly the same, with some tweaks. (1) I used a larger grow tray, (2) I installed a media guard around the reservoir for easier bucket removal, (3) I switched to coco pith, and (4) I put it under an overhang to prevent rain from diluting the solution.
Size and Calculations: More experimentation is needed to get the exact numbers right, but for now, a 5-gallon bucket should work for a grow tray measuring about 36″ x 24″ x 8″. Anything larger, and you’ll either be refilling too often, or you’ll need a bigger reservoir, which defeats the passive system’s purpose. So, for now, one 5-gallon reservoir = 36″ x 24″ x 8″ grow space.

Tips and Tricks
Keeping Rain Out: If you’re growing outdoors, keeping rain out is crucial to prevent your nutrient solution from being washed out or overflooding the grow tray. I recommend two things: First, poke a hole in the grow tray just above your desired water level to allow excess water to drain. Second, if you don’t have the system under an overhang, build a roof over it—clear plexiglass or something similar should do the trick.
Use a Media Guard: To make refilling easier, create a media guard around the bucket. Find a large plastic pot, cut it in half to the appropriate height, and drill holes to allow nutrient solution to pass through. This way, you can easily remove the bucket when needed.
Algae/Mosquito Control: A media guard will leave a gap at the top, allowing light and mosquitoes to get in. I found that cutting and fitting a pool noodle into the space worked just fine to block out pests and light.
Using the right bucket: As you can tell, I used a regular Lowes bucket, which some people say not to use. While the bucket is indeed HDPE, it is not specifically designed/labeled as food safe. Additionally, I’ve seen other hobbyists complain that the buckets allow light in which can cause algae (although I’ve never had issues with it). So all in all, if you’re wanting to do the right thing, then use a better bucket/reservoir that’s both food safe and opaque.
Grow Media: Remember that the Candlestick is still a wick system, so you’ll want to use an absorbent grow medium. I recommend coco as that’s what’s worked for me but do your own trial and error until you find what works best for you.
🌿 Candlestick Hydroponic Wicking Kit – Effortless, Fun Gardening! 🌿
The Candlestick Hydroponic Wicking Kit is an easy-to-use, passive hydroponic system designed for low-maintenance, off-grid gardening 🌿💧. It includes everything you need to grow plants without electricity or soil, along with free access to an online course for a seamless start.
Out of stock
Building the Candlestick: Step-by-Step Guide
Here’s how you can build your own Candlestick hydroponic wick system in just a few steps. The materials are relatively simple, and the setup is easy to replicate at home. Let’s get started!
Step 1: Gather Your Materials
To build the Candlestick system, you’ll need the following items:
- A 5-gallon bucket with a tight-fitting lid
- Coco pith (or your preferred absorbent grow medium)
- A grow tray (approximately 36″ x 24″ x 8″ is ideal, but feel free to adjust based on your space)
- Nutrient solution appropriate for the plants you’re growing
- A drill with a drill bit (approximately 1/2″ in size)
- A media guard (this can be made from a large plastic pot, as we’ll discuss later)
- Pool noodle (optional, but useful for pest control and light blockage)
- Measuring tape (for precise placement of the bucket hole)
- Plexiglass or another material for a rain cover (if growing outdoors)
Step 2: Prepare Your Grow Medium
The Candlestick is essentially a wick system, so your grow medium needs to be absorbent enough to pull water from the reservoir to the plant roots. I recommend using coco pith because of its superior water retention and aeration qualities. Here’s how to prepare it:
- Mix in nutrients: Before expanding the coco pith, add your nutrient solution to the water so it’s absorbed by the grow medium right from the start. This gives your plants access to the nutrients they need as soon as they’re placed into the system.
- Hydrate the coco pith: If you’re using dry coco blocks, you’ll need to expand them with water. For a 36″ x 24″ x 8″ grow tray, you’ll need about 10 gallons of water. Simply place the coco in a large container, pour the water in, and let it expand until fully hydrated.
Step 3: Modify the Bucket
The key to the Candlestick method is the inverted bucket reservoir, which releases water when the level in the grow tray falls below the hole you’ll drill. Here’s how to modify your bucket:
- Seal the bucket: After drilling the hole, make sure the bucket’s lid fits tightly to prevent your water from dumping out when it’s flipped upside down.
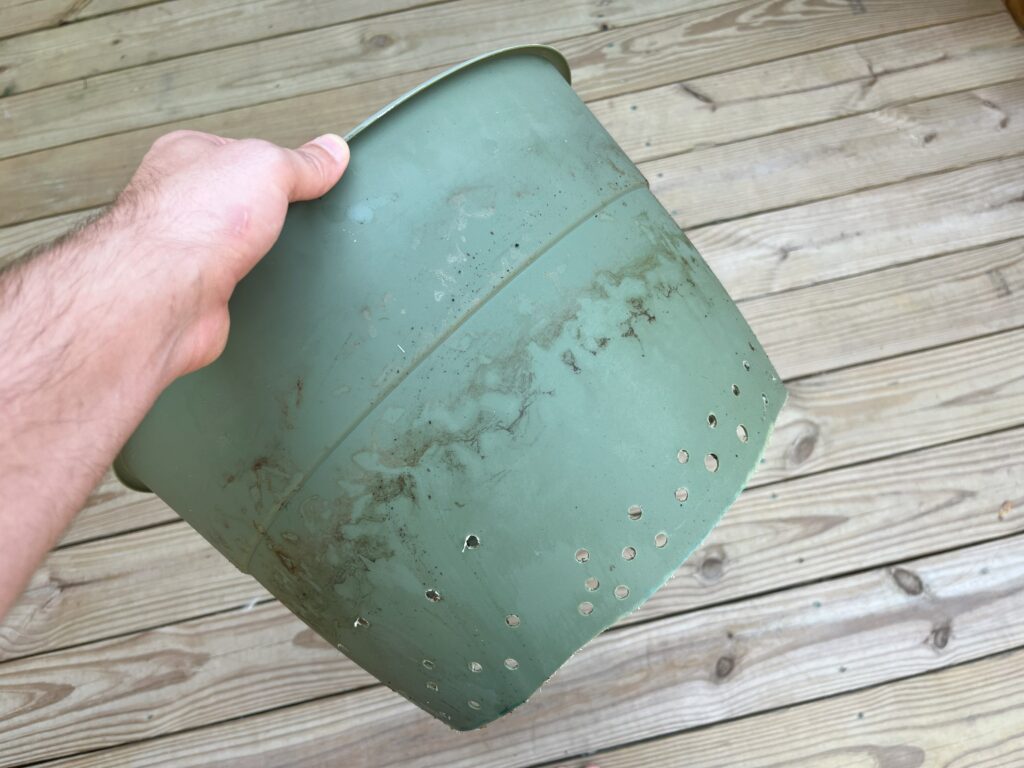
- Drill the hole: Using your drill and a 1/2″ bit, drill a hole into the side of the 5-gallon bucket, about 1-2 inches below the top rim. This hole determines the maximum water level for your system, so take care to place it at the right height.
Step 4: Create the Media Guard
The media guard makes it easier to remove and refill the bucket without disturbing the grow media too much. Here’s how you can create it:
- Find a large plastic pot: You’ll want something larger than your bucket, ideally 2-3 inches wider in diameter. If you don’t have a large pot, you can use a sturdy plastic container.
- Cut the pot in half: Measure the height of your grow tray and cut the pot in half at the appropriate height so that the top of the bucket (when upside down) is able to sit flush against the bottom of the grow tray.
- Drill holes in the media guard: Drill several small holes in the bottom and sides of the media guard to allow water and nutrients to flow through freely.
- Place the media guard in the grow tray: Position the media guard in your grow tray, ensuring it’s centered so the bucket can fit snugly inside.
Step 5: Assemble the System
Now that your materials are prepared, it’s time to assemble the Candlestick system.
- Adjust the grow medium: Once the bucket and media guard are modified, fill the grow tray with the pre-hydrated coco pith (if you haven’t done so already) around the media guard. Make sure the coco surrounds the media guard evenly, but avoid compacting it too tightly, as this will reduce aeration.
- Fill the bucket: Pour water into the 5-gallon bucket and mix in your nutrients, up to just below the hole you drilled.
- Flip the bucket: Secure the lid onto the bucket tightly, then carefully flip the bucket upside down so that the drilled hole is at the bottom. Expect the nutrient solution to spill a little bit.
- Place the bucket in the media guard: Gently lower the inverted bucket into the media guard inside the grow tray. The grow media will act as a wick, drawing water up from the tray to keep your plants hydrated.
Step 6: Add a Pool Noodle (Optional)
To prevent light and pests like mosquitoes from entering through the gap between the bucket and the media guard, cut a pool noodle to fit snugly in this space. This will block light that could encourage algae growth and stop pests (mainly mosquitoes) from breeding in the water.
Step 7: Protect from the Elements
If you’re growing outdoors, you’ll want to take measures to protect your system from rain. Too much rain can wash away the nutrient solution or flood your grow tray. Here are two ways to protect your system:
- Build a cover: Construct a simple roof or cover over your system. Plexiglass is a good option because it’s transparent and lets light through while keeping rain out. Make sure the cover is large enough to shelter the entire grow tray and bucket.
- Create a drainage hole in the grow tray: Drill a small hole near the top of your grow tray, just above your desired water level. This will allow excess rainwater to drain out instead of overfilling the tray.
Step 8: Add in Your Plants
Once your system is fully set up, it’s time to introduce your plants to their new home. Since the Candlestick is a passive hydroponic system, choosing plants that thrive in these conditions will ensure success.
- Prepare your plants: If you’re transplanting seedlings, gently remove them from their original pots, taking care not to damage the roots. Shake off any excess media or soil, as you want to keep the growing medium in your hydroponic system as clean as possible. For seeds, follow the steps below.
- Plant placement:
- For seedlings: Dig small holes in the coco pith just deep enough to accommodate the plant roots, and place the seedlings into the grow medium. Lightly pack the coco around the base of each plant to stabilize them, but make sure not to compress it too much, as this could limit the wick action of the medium.
- For seeds: If you’re starting plants from seed, sprinkle the seeds on top of the coco pith and cover them with a thin layer (about 1/4 inch) of coco. The coco pith will stay moist enough for the seeds to germinate without needing additional watering.
- Spacing: Ensure that your plants are spaced out appropriately based on the type of crop you’re growing. Overcrowding can limit airflow, reducing oxygenation and increasing the likelihood of disease. For leafy greens like lettuce or herbs, spacing them around 6 inches apart should be sufficient. Larger plants like tomatoes will need more room—typically around 12 to 18 inches apart.
- Monitoring the plants: For the first few days, keep an eye on your plants to make sure they’re adjusting well to the system. The coco pith should remain moist but not waterlogged. The passive wick system will continue to provide water and nutrients as needed, so no daily watering is required. If the grow medium starts to dry out on top, you may need to check your reservoir level.
- Adjusting light and temperature: Place your grow tray in a location where the plants will receive adequate light. If you’re growing outdoors, make sure they get plenty of direct sunlight (6-8 hours for most vegetables). If growing indoors, set up grow lights to provide the necessary light spectrum for healthy growth. Make sure the temperature stays within a range suitable for the plants you’ve chosen—most hydroponic plants prefer temperatures between 68-75°F (20-24°C)ish.
FAQs
1. What types of plants can I grow with the Candlestick system?
The Candlestick system is great for a variety of plants, especially those that don’t require a lot of water all at once. Leafy greens like lettuce, spinach, and herbs (basil, mint, parsley) thrive in this setup. Small fruiting plants such as strawberries and peppers can also do well. However, for larger, heavy-feeding plants like tomatoes or cucumbers, you may need a more active system or a larger reservoir to keep up with their water and nutrient demands (but it’s still worth trying).
2. Can I grow indoors or outdoors with this system?
Yes, you can use the Candlestick system both indoors and outdoors! If you’re growing indoors, make sure you have sufficient light—either through a sunny windowsill or grow lights. Outdoors, make sure to protect your system from rain (which could dilute the nutrient solution) and extreme weather conditions.
3. How does the Candlestick compare to other wick systems?
The Candlestick is a variation of the traditional wick system, but with a unique twist—an inverted reservoir. This design allows for more control over the water level and can support a larger grow space than many typical wick systems. For more detailed information on wick systems in general, check out our Wick System Guide or explore our resources at the Hydroponics Hobby Center.
4. How often do I need to refill the reservoir?
This depends on the size of your grow tray and the plants you’re growing. For a 36″ x 24″ x 8″ grow tray, a 5-gallon reservoir should last several days to a week, depending on how much water your plants use. The beauty of the Candlestick is its “set-it-and-forget-it” nature, but make sure to monitor the water level, especially in hot weather or when growing thirsty plants.
5. Where can I learn more about ‘off-grid’ passive hydroponic systems?
If you’re interested in learning more about passive hydroponic systems like the Candlestick, as well as off-grid setups, check out our online course Off-Grid Hydroponics. The course includes hands-on demonstrations of various methods, including the Candlestick, and provides detailed instructions on creating your own systems.